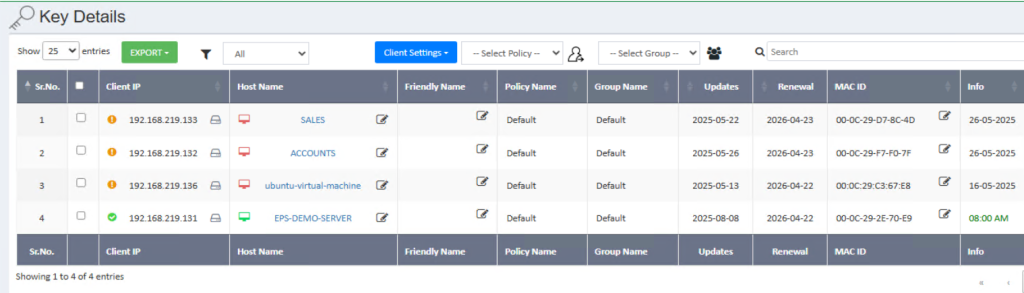
The Key Details section provides administrators with comprehensive information about client machines, including Key Number, IP Address, Host Name, and MAC ID. From this section, administrators can also apply Command Settings, Client Configuration Settings, and Top-up Settings.
Command Settings
Command Settings allow administrators to remotely control and manage processes on client machines.
1. List of Running Processes
This feature allows administrators to retrieve a list of all currently running processes on any client machine.
How to Apply List Running Processes Setting:
- Navigate to the Key Details tab.
- Enter the IP address of the machine or search for the system.
- Select the desired machine.
- Click on the Command Setting icon button.
- Select the checkbox for Running Process.
- Click Save.
A. Kill Process
The Kill Process feature enables administrators to terminate any running process on a client machine (e.g., anydesk.exe).
How to Apply Kill Process Setting:
- Navigate to the Key Details tab.
- Enter the IP address of the machine or search for the system.
- Select the desired machine.
- Click on the Command Setting icon button.
- Select the checkbox for Running Process.
- Select Kill Process from the dropdown menu.
- Enter the name of the process to kill and click Save.
B. Block Process
The Block Process feature allows administrators to prevent specific processes from running on a client machine (e.g., anydesk.exe).
How to Apply Block Process Setting:
- Navigate to the Key Details tab.
- Enter the IP address of the machine or search for the system.
- Select the desired machine.
- Click on the Command Setting icon button.
- Select the checkbox for Running Process.
- Select Block Process from the dropdown menu.
- Enter the name of the process to block and click Save.
C. Unblock Process
Administrators can use the Unblock Process feature to allow previously blocked processes to run again on a client machine.
How to Apply Unblock Process Setting:
- Navigate to the Key Details tab.
- Enter the IP address of the machine or search for the system.
- Select the desired machine.
- Click on the Command Setting icon button.
- Select the checkbox for Running Process.
- Select Unblock Process from the dropdown menu.
- Enter the name of the process to unblock and click Save.
2. Shutdown
This feature allows administrators to remotely shut down any client machine.
How to Apply Shutdown Setting:
- Navigate to the Key Details tab.
- Enter the IP address of the machine or search for the system you want to manage.
- Select the desired machine.
- Click on the Command Setting icon button.
- Select the checkbox for Power Off Setting.
- Choose Shutdown from the dropdown menu.
- Select the desired delay in seconds from the dropdown and click Save.
3. Restart
This feature enables administrators to remotely restart any client machine.
How to Apply Restart Setting:
- Navigate to the Key Details tab.
- Enter the IP address of the machine or search for the system you want to manage.
- Select the desired machine.
- Click on the Command Setting icon button.
- Select the checkbox for Power Off Setting.
- Choose Restart from the dropdown menu.
- Select the desired delay in seconds from the dropdown and click Save.
4. Update Now
Administrators can use this feature to instantly update the NPAV product on a client machine.
How to Apply Update Now Setting:
- Navigate to the Key Details tab.
- Enter the IP address of the machine or search for the system you want to manage.
- Select the desired machine.
- Click on the Command Setting icon button.
- Select the checkbox for Update Now Setting.
- Click Save.
5. Scan Now
This feature allows administrators to instantly launch the NPAV scanner on a client machine.
How to Apply Scan Now Setting:
- Navigate to the Key Details tab.
- Enter the IP address of the machine or search for the system you want to manage.
- Select the desired machine.
- Click on the Command Setting icon button.
- Select the checkbox for Scan Now Setting.
- Click Save.
6. Antivirus Control
Administrators can enable or disable the antivirus for a specific duration on a client machine.
How to Disable Antivirus:
- Navigate to the Key Details tab.
- Enter the IP address of the machine or search for the system you want to manage.
- Select the desired machine.
- Click on the Command Setting icon button.
- Select the checkbox for Antivirus.
- Choose Disable from the dropdown menu and click Save.
How to Enable Antivirus:
- Navigate to the Key Details tab.
- Enter the IP address of the machine or search for the system you want to manage.
- Select the desired machine.
- Click on the Command Setting icon button.
- Select the checkbox for Antivirus.
- Choose Enable from the dropdown menu and click Save.
7. Set Update Server
This feature allows administrators to designate any client machine as an NPAV update server.
How to Apply Set Update Server Setting:
- Navigate to the Key Details tab.
- Enter the IP address of the machine or search for the system you want to configure.
- Select the desired machine.
- Click on the Command Setting icon button.
- Select the checkbox for Set Update Server.
- Choose ON from the dropdown menu and click Save.
Client Configuration
The Client Configuration section allows administrators to manage various settings on client machines, including launching applications, configuring registry/INI file values, controlling power states, and managing server IP settings.
1. Shell Execute
This setting enables administrators to remotely run any application on a client machine.
How to Apply Shell Execute Setting:
- Navigate to the Key Details tab.
- Enter the IP address of the machine or search for the desired system.
- Select the target machine.
- Click on the Client Configuration Setting icon button.
- Select the checkbox for Shell Execute.
- Enter the full path of the application you wish to launch.
- Enter any command-line arguments (if applicable) and click Save.
2. Configure Client
This setting allows administrators to set values directly in the registry or .ini files on a client machine.
How to Apply Configure Client Setting:
- Navigate to the Key Details tab.
- Enter the IP address of the machine or search for the desired system.
- Select the target machine.
- Click on the Client Configuration Setting icon button.
- Select the checkbox for Configure Client Setting.
- Select HKLM (HKEY_LOCAL_MACHINE) from the dropdown menu (other root keys may be available depending on the system).
- Enter the full registry path.
- Enter the key name.
- Enter the value and click Save.
3. Shutdown
Administrators can use this setting to remotely shut down a client machine.
How to Apply Shutdown Setting:
- Navigate to the Key Details tab.
- Enter the IP address of the machine or search for the desired system.
- Select the target machine.
- Click on the Client Configuration Setting icon button.
- Select the checkbox for Power Setting.
- Choose Shutdown from the dropdown menu.
- Click Save.
4. Restart
Administrators can use this setting to remotely restart a client machine.
How to Apply Restart Setting:
- Navigate to the Key Details tab.
- Enter the IP address of the machine or search for the desired system.
- Select the target machine.
- Click on the Client Configuration Setting icon button.
- Select the checkbox for Power Setting.
- Choose Restart from the dropdown menu.
- Click Save.
5. Set ACIP
This setting is used to set the EPS server IP in ACIP (Anti-Client IP) if client configurations are not being implemented correctly.
How to Apply Set ACIP Setting:
- Navigate to the Key Details tab.
- Enter the IP address of the machine or search for the desired system.
- Select the target machine.
- Click on the Client Configuration Setting icon button.
- Select the Set IP Setting checkbox.
- Select ACIP from the dropdown list.
- Enter the ACIP address.
- Click Save.
6. Set IP
This setting allows administrators to set the EPS server IP as the primary IP if a client machine is not receiving updates from the server.
How to Apply Set IP Setting:
- Navigate to the Key Details tab.
- Enter the IP address of the machine or search for the desired system.
- Select the target machine.
- Click on the Client Configuration Setting icon button.
- Select the Set IP Setting checkbox.
- Select IP from the dropdown list.
- Enter the IP address.
- Click Save.
Top-up Setting
The Top-up feature allows administrators to extend the NPAV antivirus subscription for a client machine if it has expired.
How to Apply Top-up Setting:
- Navigate to the Key Details tab.
- Enter the IP address of the machine or search for the desired system.
- Select the target machine.
- Click on the Top-up Setting icon button.
- Enter the new key.
- Click Top-up.
Change Host Name
This feature allows administrators to modify the host name of a client machine.
How to Change Host Name:
- Navigate to the Key Details tab.
- In the Key Details tab, enter the IP address of the machine or search for the desired system.
- Select the target machine.
- Click on the Edit button.
- Enter the new host name.
- Click Update.
Free Key
The Free Key feature allows administrators to transfer a product key from one client machine to another. This is useful when re-deploying licenses or replacing hardware.
How to Free a Key:
- Navigate to the Key Details tab.
- In the Key Details tab, enter the IP address of the machine or search for the system.
- Select the desired machine.
- Right-click on the IP Address, Host Name, or Key Number.
- Click on Check Free Key.
- Enter a reason for freeing the key and click Make Free.
Check Connectivity
This feature enables administrators to verify if a client machine is actively connected to the server.
How to Check Connectivity:
- Navigate to the Key Details tab.
- In the Key Details tab, enter the IP address of the machine or search for the system.
- Select the desired machine.
- Right-click on the IP Address, Host Name, or Key Number.
- Click on Check Connectivity.
Assign Policy
Administrators can assign security policies to client machines directly from the Key Details tab.
Method 1: Assigning Policy via Right-Click
- Navigate to the Key Details tab.
- Enter the IP address of the machine or search for the system.
- Select the desired machine.
- Right-click on the IP Address, Host Name, or Key Number.
- Under Assign Policy, click on the policy you want to assign.
Method 2: Assigning Policy via Dropdown
- Navigate to the Key Details tab.
- Enter the IP address of the machine or search for the system.
- Select the desired machine.
- Click on the Select Policy dropdown.
- Select the policy you wish to assign.
- Click on the Assign Policy icon button.
Assign Group
Administrators can assign client machines to specific groups directly from the Key Details tab.
Method 1: Assigning Group via Right-Click
- Navigate to the Key Details tab.
- Enter the IP address of the machine or search for the system.
- Select the desired machine.
- Right-click on the IP Address, Host Name, or Key Number.
- Under Assign Group, click on the group you want to assign.
Method 2: Assigning Group via Dropdown
- Navigate to the Key Details tab.
- Enter the IP address of the machine or search for the system.
- Select the desired machine.
- Click on the Select Group dropdown.
- Select the group you wish to assign.
- Click on the Assign Policy icon button (Note: This button might be labeled “Assign Group” for clarity).
Remote Setting
The Remote Setting feature allows administrators to establish a remote desktop connection to a client machine.
How to Take Remote:
- Navigate to the Key Details tab.
- In the Key Details tab, enter the IP address of the machine or search for the system.
- Select the desired machine.
- Click on the Remote Desktop button.
- If you require client consent before taking remote control, click Yes when prompted.
- If you do not require client consent, click No.
