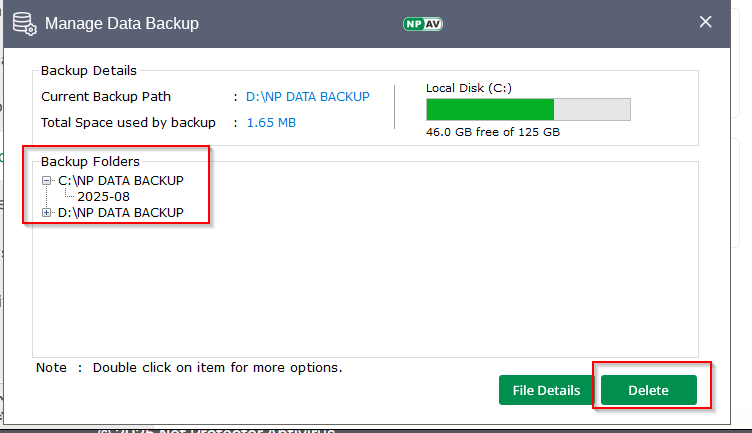
User Delete Old Backups files from Backup drive. And also All other drives Backup where NP DATA
BACKUP Folder is created,
just Open Net Protector GUI -> Protection -> Data Backup -> Manage Backup -> Select Backup Path
-> Delete
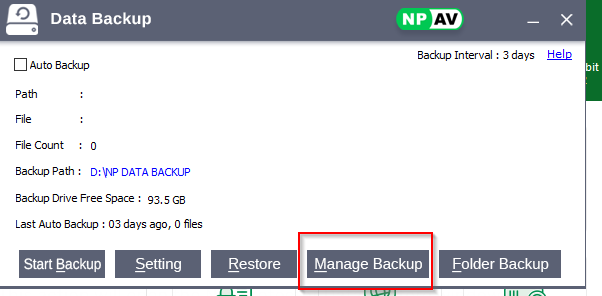
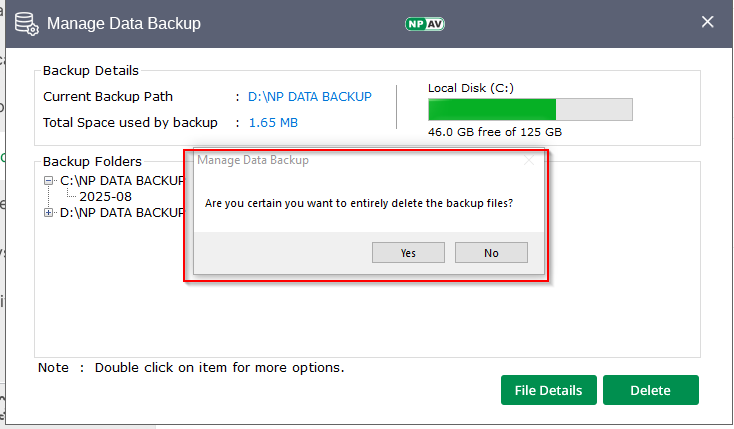
If User Click To Delete Button Then Delete Confirmation message Given to the User. if click to Yes
Backup Deleted sucessfully
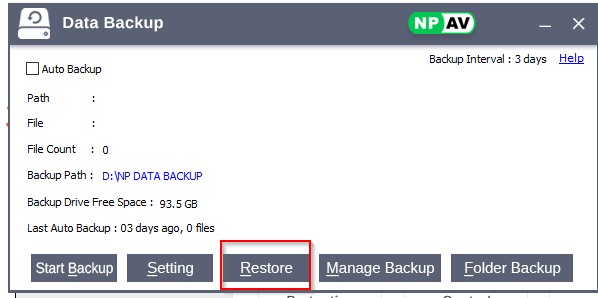
Steps to Restore Data
1. Accessing the Restore Feature
- Open Net Protector GUI:
- Navigate to:
Protection->Data Backup->Restore.
- Navigate to:
2. Opening the Data Restore Window
- Click on the Restore Button:
- This action will open the Net Protector Data Restore window.
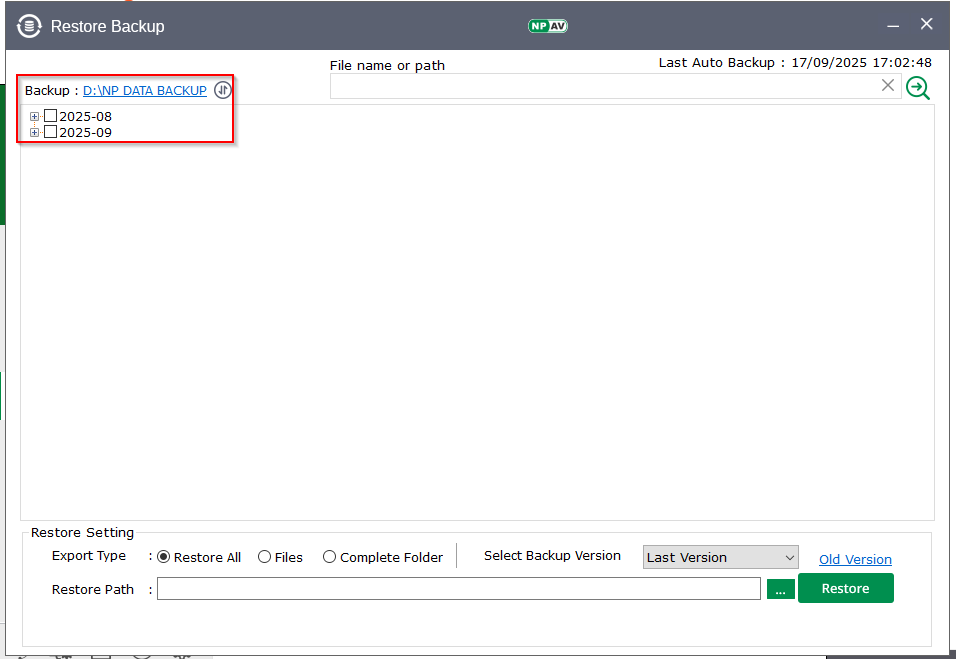
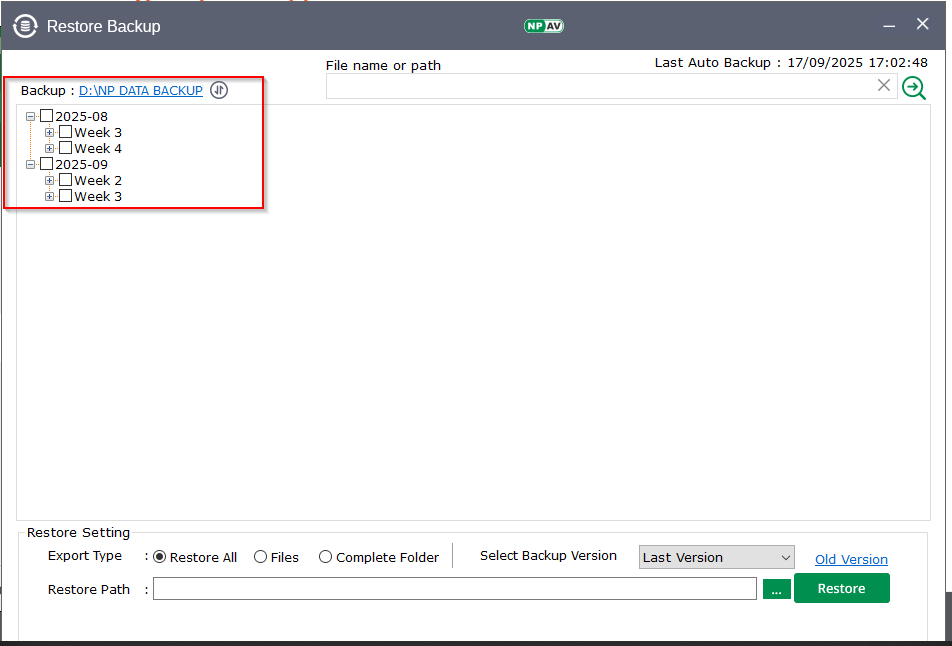
3. Viewing Available Backups
- Available Data Backups:
- The window displays all available data backup files organized by month and week, for example:
2016-07 Week 12016-06 Week 4
- The window displays all available data backup files organized by month and week, for example:
4. Choosing Export Type
- Select What to Restore:
- Options include:
- Restore All
- Complete Folder
- Files
- Options include:
- Recommendation:
- It is recommended to select the latest month and week for restoration.

5. Understanding Incremental Backups
- Incremental Backup:
- Note that Net Protector Data Backup takes incremental backups. The latest month backup contains all previous month files, modified files, and newly added files in an incremental manner.
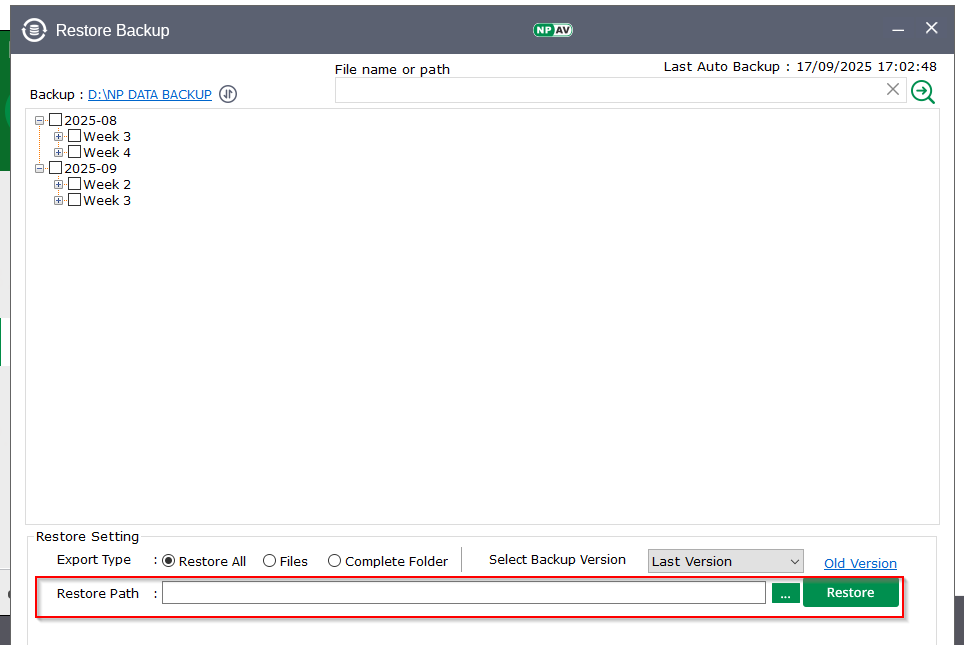
6. Restoring Complete Folders
- Select Source Folder:
- Choose the source folder (e.g.,
E:\orC:\mydata\) from the list view.
- Choose the source folder (e.g.,
- Browse Restore Path:
- Specify the desired restore path.
- Click on Restore Button:
- This will restore your data as folders, including all files.
7. Restoring Individual Files
- Select Files:
- Choose the specific files from the list view.
- Browse Restore Path:
- Specify the desired restore path.
- Click on Restore Button:
- All selected files will be restored successfully to the specified path.
8. Searching for Specific File Types
- Search Functionality:
- Use the search feature to find particular file types for restoration.
9. Drive-Wise Search
- Search Drive Wise:
- You can search for files on specific drives and restore them as needed.
This structured guide provides a clear and concise process for restoring data using Net Protector, ensuring users can follow the steps easily.
NPDATABKP:
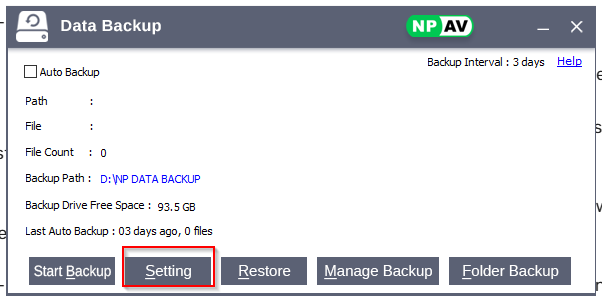
– Npdatabkp is presented under protection tab.
– Takes Data Backup of Users Critical Files.
– Data Recovery: Enables restoration of lost or corrupted data due to hardware failures, accidental deletions, or software issues.
– Version Control: Allows users to access previous versions of files, facilitating recovery from unwanted changes or errors.
– Used to take extensionwise folder/files bkps of last 90 days.
– Backups are usually encrypted to keep sensitive information safe from unauthorized access.
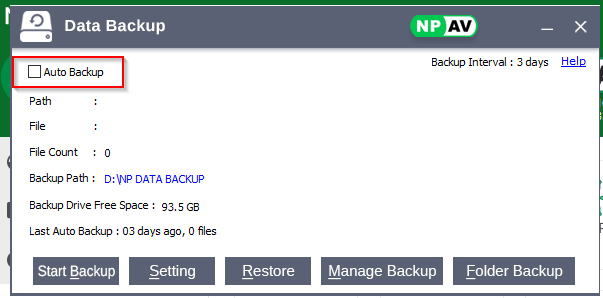
– Steps to take Npdatabkp : [Manually]
– Step 1: Open the Net Protector and click on PROTECTION.
– Step 2 : Select the Data Backup Option.
– Step 3 : If you don’t want to take backup in future, untick auto-backup option. It will ask for confirmation about deleting old backup.

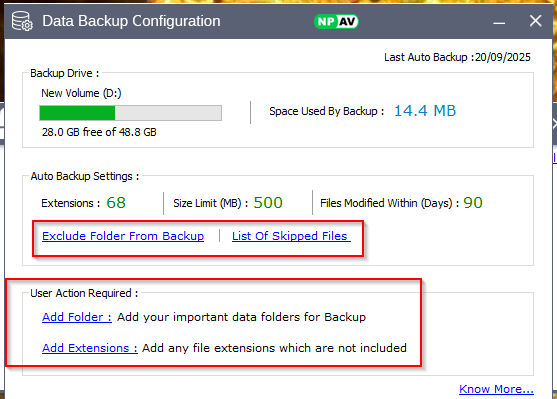
– Step 4 : Select ‘Setting’ option setting window is open.
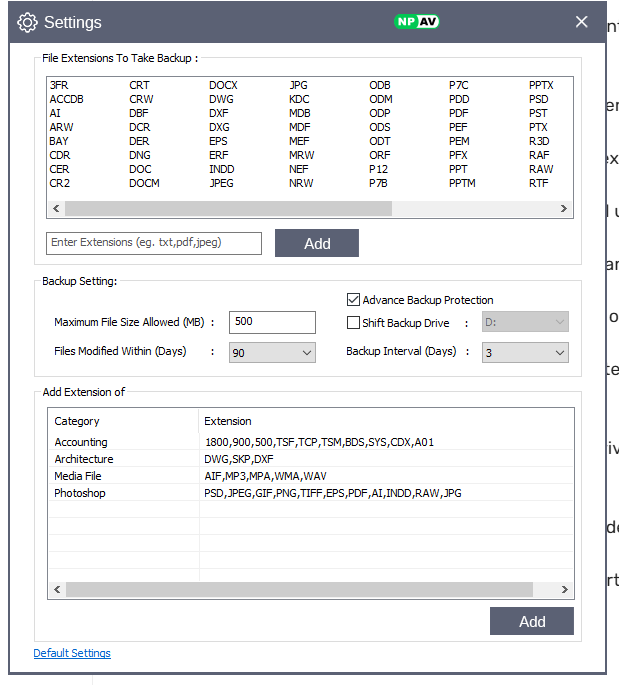
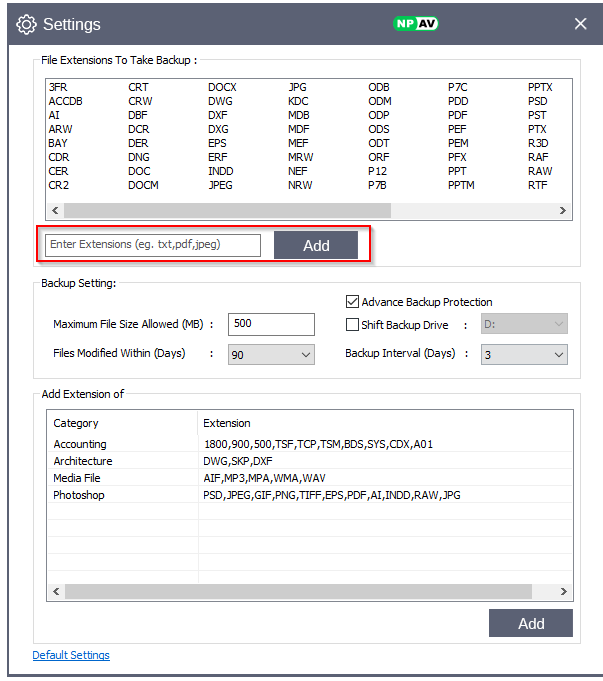
– Step 5 : By default some extensions are added into extensions.
If u want to add your own extensions then add ur extention & click on add.
– Step 6 : select file size of files within which size that u want to bkp ,
select only those files modified within days & only take those files bkps,
select backup interval days (max 7) means after how much days u want to take next bkp when first take
Select shift bkp drive if u have two or more drives available & u want to shift ur databkp , tick that check box & just select ur drive
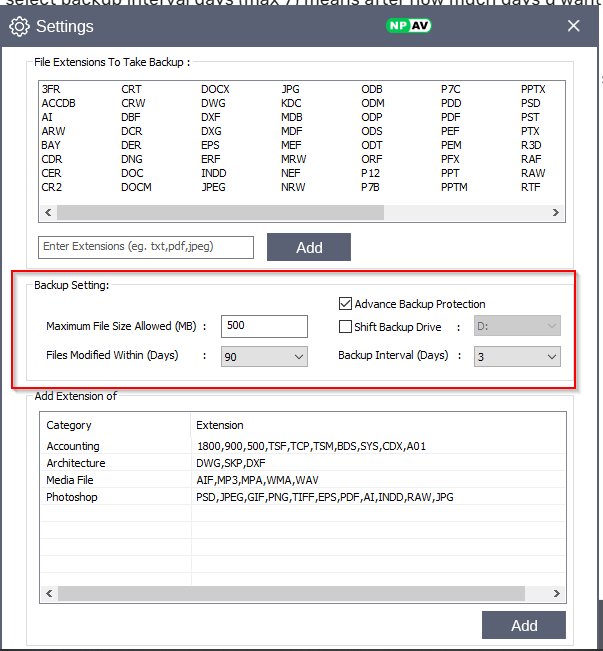
– Step 7 : If u want to set permission or lock ur bkp folder after bkp , then select advanced bkp protection
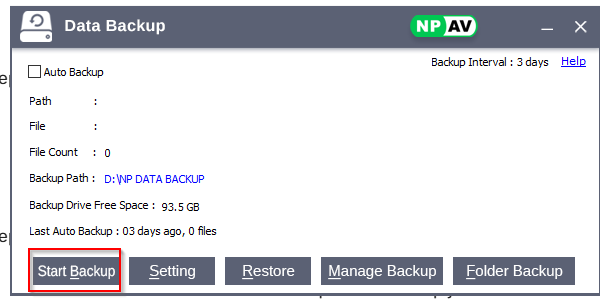
– Step 8 : Close setting tab & start bkp , ur bkp will start
– Steps to take Npdatabkp : [Auto]
– Step 1: Open the Net Protector and click on PROTECTION.
– Step 2 : Select auto bkp check box
Select folder bkp option , it show on which drive u take bkp
– Step 3 : In auto bkp setting , click on Exclude folder from bkp hyperlink
choose that folder that u want to exclude from bkp.
choose list of skiped files show skiped files after bkp.
– Step 4 : User action required is the important section on it
Choose add folder section it will open create bkp job section.
Choose custome folder or any folder , select indclude sub folder it includes sub folder in it
Select extention u want to include , exclude or take all.
Select other settings & save job, it will save & showned in bkp job list section.
On home window of npdatabkp shows bkp interval, while running bkp shows path , files which will currently in bkp process , drive free space & last auto bkp
